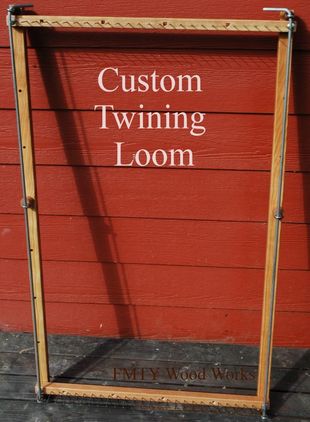
I recently finished a twining loom for some friends of ours. It took me a while to get everything perfect and to fit correctly but once it was all done I knew it was well worth the effort. It was easier to get it done because I had made one for my mom last year. Even though hers wasn't perfect, it showed me what I needed to change to make this one work better. 
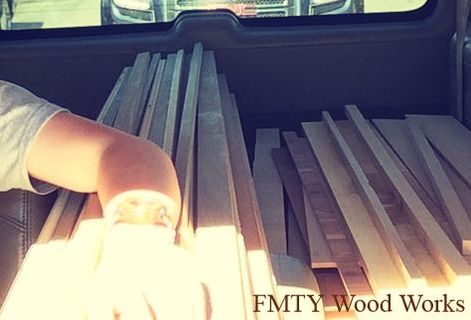
The first thing was to cut the pieces to size. I delayed this project until I could get a table saw. I knew I would need it to more accurately cut my pieces. I saved for several months and my dad and I bought it together. My dad also gave me a safety class and he helped me cut the pieces on the table saw to width, then I cut them to length with a hand saw. After sanding, I measured and marked the holes for the bolts and nails. I had to consider the distances best suited for varying sizes of projects on the loom. This can make table runners, rugs, place mats, and much more. I also designed it to be collapsible and quite portable. 
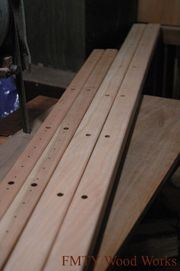
After drilling the holes I tried to do some routering. I had routered my mom's to make it look nicer so I figured I would do it on this one as well. I found the router took too much away from the sides and would make it more fragile, so I ended up having to make new pieces that I just rounded by hand. 
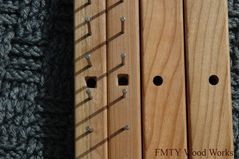
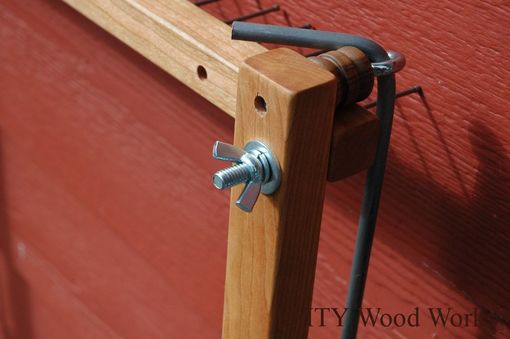
I used carriage bolts for the loom, so I had to cut square holes with my hand carving tools for the bolts to go into and not twist when tightening the wing nuts. I carefully hammered in all the nails and tried to get them as perfect and straight as possible. 
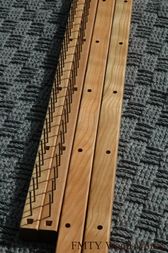
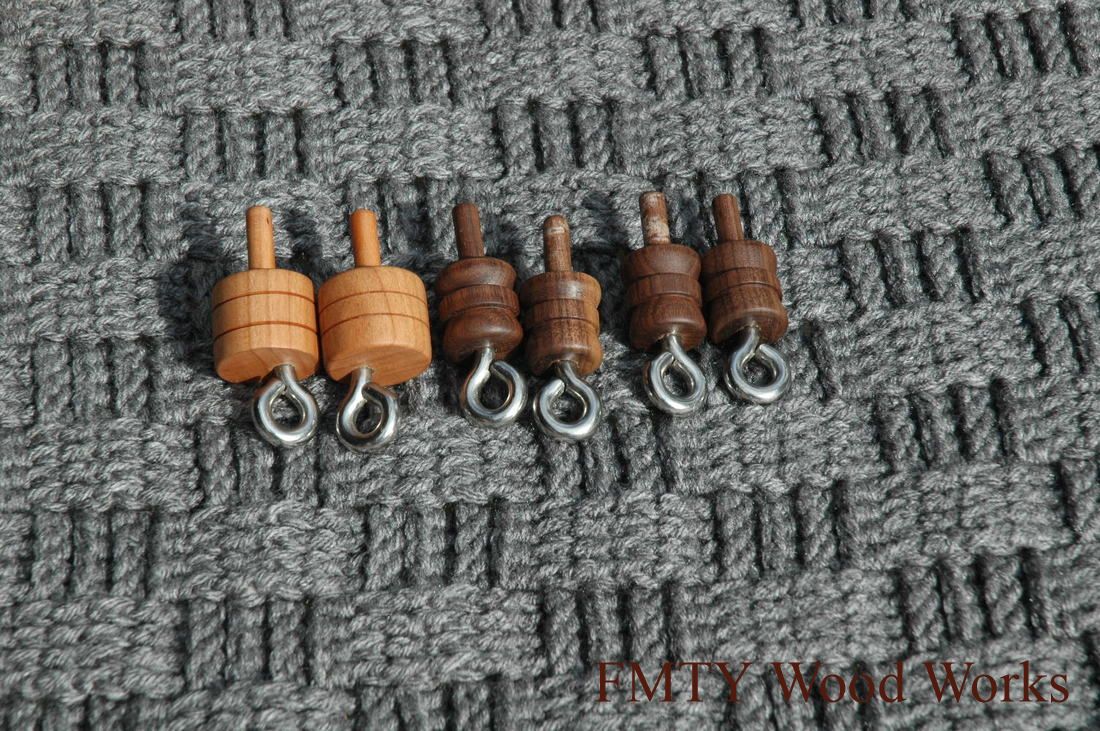
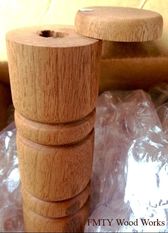
I then started to work on the parts to hold the rod. I had to modify my design to strengthen the support so I designed pieces to hold the rod on either side. These pieces make it easier to change your twining size as they can be simply pulled out (similar to a dowel), then put back into another hole. Each piece was turned by hand from a solid piece of wood with the dowel on one side and a hole for the eye bolt on the other. Some of the holes had to be off-centered to line up with the off-centered sides correctly. The top and bottom pieces of wood were made with Walnut and the middle pieces were made with Cherry. This enables the twiner to better discern where each piece belongs. After turning the pieces and getting everything correct I put the eye bolts in, four of the six pieces I made I drilled the holes in while they were on the lathe, because they didn't need off centered holes as I had made centered holes with an added inch I had at both ends of the side pieces. Finally after a lot of correcting and redoing I bent the rods at a 90 degree angle and put on the finishing touches. 
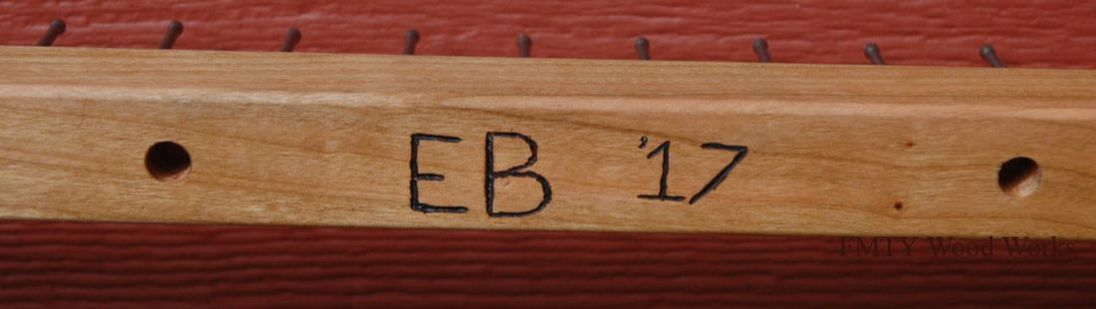
My client (friend) was very happy to get the loom and the family was impressed by my workmanship and said it looked very professional. I even included my 'Maker's Mark' and she thought it was great! Over all, it was hard work & many hours to get everything perfect but I was happy with the outcome of this project and hope to get more things done soon. I like doing things and learning a whole bunch, but I'm finding I have a challenge working on things for such a LONG time. I am thinking about how I can do smaller projects with more instant gratification in between to give my mind a break and help encourage me.
0 Comments
At one of our events this year, I saw a man I helped out with some sheep shearing in April. He and his wife also had a booth there and I thought I would say 'hi' and show him some of my work as I had briefly mentioned my woodworking when I helped him with the shearing. Commenting on the quality of all of the things I had made, he asked if I would be able/willing to try out some rosettes for his older 1920's home, as he could not found someone to do them for him. He said he would paint them so they didn't need to have a perfect surface or be a special wood. I told him I would be more than happy to try them out and will give him an update and a price point when I finish a few. The next day he brought a rosette to let me use to replicate them. At first I wasn't quiet sure if I would use a rosette cutter or turn them on the lathe, but after further research and talking to a local antique home restorer, I learned that craftsmen during this time period often made their own custom rosette cutters. I decided the easiest and most cost effective way to do it would be to turn them on the lathe. I selected some quality cherry after also discussing potential chipping issues of different woods with the antique home restorer. After cutting a few pieces on the table saw, with the help of my Dad, we noticed that they looked crooked. So, we had to take some pieces off of the table saw and figure out how to correct it. After some minor adjustments we were getting all the pieces cut straight.
I had already been considering the best way to center and mount them so I started turning them on the lathe. My first rosette went great and I figured I'd only get better and faster as I progressed. I was wrong. I needed to contact him immediately because there was just a 1/8" difference in thickness between the original and the one I turned. I thought he may want to meet and see it for himself, but after describing the challenge in detail and sending him pictures, he was happy to have me continue; acknowledging that the painting could make up for that small variance. Getting back on the lathe I found each piece of wood, although the same type, acted a little differently and getting all of them the same size proved challenging. I learned several lessons during this project. When all the rosettes were finished I scheduled a meet up. After looking at them he was very impressed with my quality of workmanship and was excited to finally find someone who could do them. It was a great opportunity to learn something new and add to my skill set, which I'm happy to have always increasing, yet never full. I recently received a custom order for some beads. A woman looking at my quality creations asked if I have ever or would be interested in trying to do some beads, as she was looking for some specific beads for lanyards she would be giving as awards. I told her I haven't, but would be more than happy to try out something new and add to my skills. After roughly figuring out the size with a quick sketch, I gave her my business information and asked her a few questions to get the correct size and amount she wanted. After getting the measurements from her, I tried a few out and sent her some pictures of them and the price I was thinking. She said they looked beautiful but was wondering if I could make them a little bigger and do three pairs of curly woods and three pairs of normal. After finding some curly and burled wood pieces from my unique stock, cutting them to size, turning them to be perfect pairs and finishing with fine sand paper, I took pictures and sent them off for her approval. Once she saw them in person she was very excited to have them and was glad I was able to do them. Although it was a new challenge, I am thankful to have developed new skills and have another happy customer thanks to the gifts God has given me.
While we were at the Shepherd's Extravaganza our neighboring vendor, Robin purchased an antique spinning wheel. She was enamored with it's beauty and wanted a special orifice hook to complement the craftsmanship. Unfortunately, the designs I had would not fit into the very small orifice. We discussed options and I was sure I could come up with a design that would work. That night, I went back to my wood shop and found a piece I knew would color match really well. Dad and I stayed behind the next morning and I was able to later bring her a one-of-a-kind, hand turned, dark walnut orifice hook. The design will fit into the smallest orifice and it has a recessed portion for determining your Wraps Per Inch.
At the Shepherd's Extravaganza a customer, Jen, liked my shawl pins but I didn't have what she was looking for. She wanted a smaller, thinner pin with a smaller loop for her tighter knit shawl. We looked around the booth for a bit, coming up with different variations in woods and discussing her needs. It was pretty busy and I asked her to swing back by and later I'd have a drawing for her to look at. When things slowed I was able to sketch a design for her approval. When Jen came back through the 'J' Barn she was happy with my drawing, paid in advance (thank you!) and we kept in touch via text on my progress. Once it was completed we coordinated a meet up for delivery. She was very happy with her pin and asked for another business card to share with friends. I was glad to meet her needs exactly and hope to have more repeat business from happy customers!
Recently I found some old things I made and comparing them to the things I am making now I can really see how my skill level has changed. Below are a couple of crochet hooks. As time has passed I've gotten better and also implemented some laminating into my projects for a better and more professional look. The newer spindle style on the Left The new crochet hook style on Right!
A friend of ours wanted me to make her a niddy noddy. That is a tool used to wind yarn. She wanted it to be a 2 yard yarn winder and she wanted to have it a nice, dark color so I chose walnut for strength and beauty. To complete the project, I ended up making several trial niddy noddy pieces. The first one was a little too long and Mom was happy to have it, so things worked out perfectly. The second one, I did the handle a little too thin so I made another, thicker version to better match the arms. There were many days of trial and error, but I wanted to have it perfect. After all of that I finally finished it, it has a nice tight seal, can be taken apart for travel, and winds a full 2 yards. She also wanted me to try to do something with an old evergreen burl they had on a tree stump. When I got it from her it looked like I could make at least a couple bowls from it... but, when I started to work on it a little there was lots of rot and termite damage. Ended up needing to soak it, and carefully cut out the best wood pieces, dry them slowly then work with what remained. I ended up being able to make 2 shallow dishes and one pen. It was a fun project, I learned more, and it smelled so good turning it. Over all she and her husband really liked everything I made and they were very happy with the quality.
Now that I have everything organized and put in there, my Uncle had a request for a wood pen he wanted me to make for him. I had not done any pens before so I did some research on them and got the parts I needed. What I needed was a pen mandrel for my lathe, which I found at our local wood working store. I also got one of each color of the starter pen kits. I did his in gun metal with some curly looking walnut. After I had practiced with all of the colors, I also made him a lathe turned case to go with it. He liked it a lot, so I also made one for my wood supplier to thank her for all the wood, and I got a request from my grandma to do one with Mahogany and copper. My Dad got me a designer pen kit he thought I might like to try, so I laminated some woods together to try out on some pens, and see what I could do. I tried one to see how I liked it, and saw what I needed to do on the next one to make it work, and the next one I did was the designer pen kit. It came out really nice and my Dad liked it when I gave it to him, and I also made one for my Mom. So, after learning a new skill and doing some projects in between, I am happy that things have been turning out well! Pun intended - LOL! As some of you know, just over a year ago a tree fell on our house, and we are now one year away from what we used to have. With the new house in and most of the work done, I have been able to do more wood working. During late summer, I started out just working outside on a table and covering it up at night just in case it was to rain. My second shop was under our RV canopy, which was a little bit crammed and was somewhat exposed to the elements. Just before Fall, my third shop was a 10x20 carport canopy, I made my own custom work bench out of free woods I got from a couple pallets and some other recycled woods. It was the perfect height and I had all my woods organized which worked well at first, but then the moisture was getting underneath and coming in through the sides, things were getting ruined! Now into Winter, I moved everything to our homesteader's cabin. It has plenty of room for everything as long as I keep it organized. I was pretty frustrated I couldn't fit my workbench in there, but I managed to make something that works well for now. I am glad I got everything in there because it has a wood stove which we had in our old house but not in our new one. I didn't really know how much I enjoyed the wood stove until I had it back again.
During these various moves I had been working back into my projects. I started turning regular and larger crochet hooks for rag rugs and a HUGE Tunisian Crochet Hook for a cowl my sister made with roving. I also made my first Niddy Noddy (to wind home spun yarns) and I also worked on some bowls, and found that I was able to do a better job than I had in the past; keeping my tools sharp also played a big part in it. I got excited about a project my mom saw and I made a small acorn ring box. It was challenging to figure out how to make two parts fit together and making the stem was my smallest piece yet. After that I wanted a more 'manly' project and made a wooden butterfly knife! It was not that dangerous because it was made of wood. I am pretty exited to see what projects I will be doing in the future, and what type of setup I might have then, since I wouldn't have ever expected to be where I am today. |
Who am I?
I am a 17 year old woodworker always sharpening my skills and bringing new projects to the table. I hope you enjoy reading about my custom creations, personal projects, and shop progress. Plus you can check out my gallery here. Archives
June 2018
Categories
All
|